Frigate on Proxmox with GPU
By default Frigate is offered as a Docker container that makes the installation process simple and relatively unified for various users. And for the docker engine itself, you may opt for running it directly on a host OS, in a VM, or even in an upper virtualization layer.
Although running Frigate itself on any docker environment is straigtforward, it could be more challenging to setup the GPU acceleration as the level of virtualization increases. This guide will hopefully help those who want to run Frigate on their Proxmox server with an Nvidia GPU for ML acceleration.
This will be realized through running an LXC container that hosts a docker engine.
In a nutshell:
- Install Nvidia driver on the Proxmox host.
- Create LXC container and share nvidia kernel modules of host with the LXC container.
- Install Docker and Nvidia Container Runtime in LXC container.
- Install Frigate with hardware acceleration.
Note: First two steps are also covered in the other post. They are repeated here for the sake of completeness.
Shout out: Step one and step two are largely based on Yomi’s excellent blog post here. Feel free to follow that if you choose to, or failed with the instruction below.
My proxmox host is Debian (11) Bullseye, and LXC container is Ubuntu (22.04) Jammy Jellyfish.
Install Nvidia driver on the Proxmox host
Important: Make sure the GPU is not passed through any existing VM on the Proxmox supervisor.
Download driver
We will not use apt repository to install the driver, but instead download the .run file from Nvidia servers. This is crucial because we want to install the exact same driver in both Proxmox host and LXC container.
Find a recent driver from Nvidia archive:
https://download.nvidia.com/XFree86/Linux-x86_64/
Attention: NVidia Tensor RT detector on Frigate requires driver version >=530 (see details). I used version 550.127.05, but you may choose more recent version.
Tip: Use Nvidia’s driver search tool if the link above does not work.
Install driver
Run .run file with --dkms flag, which is important to install the kernel modules. Do not install display-related (xorg etc.) modules during installation.
$ sh NVIDIA-Linux-x86_64-550.127.05.run --dkms
Reboot proxmox host. When you log back in, run nvidia-smi to check if the driver installed correctly:
$ nvidia-smi
Sat Oct 26 23:19:53 2024
+-----------------------------------------------------------------------------+
| NVIDIA-SMI 550.127.05   Driver Version: 550.127.05   CUDA Version: 11.4     |
|-------------------------------+----------------------+----------------------+
| GPU  Name        Persistence-M| Bus-Id        Disp.A | Volatile Uncorr. ECC |
| Fan  Temp  Perf  Pwr:Usage/Cap|         Memory-Usage | GPU-Util  Compute M. |
|                               |                      |               MIG M. |
|===============================+======================+======================|
|   0  NVIDIA GeForce ...  On   | 00000000:01:00.0 Off |                  N/A |
|  0%   47C    P8    13W / 180W |      1MiB /  8117MiB |      0%      Default |
|                               |                      |                  N/A |
+-------------------------------+----------------------+----------------------+

+-----------------------------------------------------------------------------+
| Processes:                                                                  |
|  GPU   GI   CI        PID   Type   Process name                  GPU Memory |
|        ID   ID                                                   Usage      |
|=============================================================================|
|  No running processes found                                                 |
+-----------------------------------------------------------------------------+
Remember: You may need to repeat this process (possibly with more recent driver version) if you upgrade the proxmox kernel (e.g., upgrade proxmox from Debian 11 to Debian 12).
Share GPU with LXC Container
Next, we will share the kernel modules on the proxmox host with an LXC container.
You may use an existing LXC container. Otherwise create a new one if you haven’t done already.
LXC Configuration on the Proxmox host
Still on the proxmox host, list nvidia devices:
$ ls -al /dev/nvidia*
crw-rw-rw- 1 root root 195,   0 Oct 25 22:57 /dev/nvidia0
crw-rw-rw- 1 root root 195, 255 Oct 25 22:57 /dev/nvidiactl
crw-rw-rw- 1 root root 195, 254 Oct 25 22:57 /dev/nvidia-modeset
crw-rw-rw- 1 root root 234,   0 Oct 25 22:57 /dev/nvidia-uvm
crw-rw-rw- 1 root root 234,   1 Oct 25 22:57 /dev/nvidia-uvm-tools
Note down the numbers in the column next to the group column. They are 195 and 234 in my case, yours could be different.
My LXC container ID is 105. I opened its configuration file with nano. You may as well use other preferred text editor, such as vi, vim, nvim etc.
$ nano /etc/pve/lxc/105.conf
Append the following to the .conf file. Remember to use the numbers you found earlier (195 and 234).
lxc.cgroup2.devices.allow: c 195:* rwm
lxc.cgroup2.devices.allow: c 234:* rwm
lxc.mount.entry: /dev/nvidia0 dev/nvidia0 none bind,optional,create=file
lxc.mount.entry: /dev/nvidiactl dev/nvidiactl none bind,optional,create=file
lxc.mount.entry: /dev/nvidia-uvm dev/nvidia-uvm none bind,optional,create=file
lxc.mount.entry: /dev/nvidia-modeset dev/nvidia-modeset none bind,optional,create=file
lxc.mount.entry: /dev/nvidia-uvm-tools dev/nvidia-uvm-tools none bind,optional,create=f>
lxc.mount.entry: /dev/dri dev/dri none bind,optional,create=dir
Configuration of the Proxmox host is complete here. Rest of the instructions are to be done in the LXC container.
Install driver on LXC container
Start the LXC and switch to console. Download the exact same NVIDIA-Linux-x86_64-550.127.05.run driver into the LXC container and run with --no-kernel-module flag to skip the installation of kernel modules. It will share them with the Proxmox host.
Do not install display-related (xorg etc.) modules during installation.
$ sh NVIDIA-Linux-x86_64-550.127.05.run --no-kernel-module
Reboot the LXC container and run nvidia-smi after login. You should see the same output as in the proxmox host:
$ nvidia-smi
Sun Oct 27 04:16:31 2024
+-----------------------------------------------------------------------------+
| NVIDIA-SMI 550.127.05   Driver Version: 550.127.05   CUDA Version: 11.4     |
|-------------------------------+----------------------+----------------------+
| GPU  Name        Persistence-M| Bus-Id        Disp.A | Volatile Uncorr. ECC |
| Fan  Temp  Perf  Pwr:Usage/Cap|         Memory-Usage | GPU-Util  Compute M. |
|                               |                      |               MIG M. |
|===============================+======================+======================|
|   0  NVIDIA GeForce ...  Off  | 00000000:01:00.0 Off |                  N/A |
|  0%   48C    P8    13W / 180W |      1MiB /  8117MiB |      0%      Default |
|                               |                      |                  N/A |
+-------------------------------+----------------------+----------------------+

+-----------------------------------------------------------------------------+
| Processes:                                                                  |
|  GPU   GI   CI        PID   Type   Process name                  GPU Memory |
|        ID   ID                                                   Usage      |
|=============================================================================|
|  No running processes found                                                 |
+-----------------------------------------------------------------------------+
Now our LXC container can use GPU!
Install Docker and Nvidia Container Runtime
Install the docker engine by following the official instructions:
https://docs.docker.com/engine/install/ubuntu
Install nvidia-driver-toolkit
Add nvidia-driver-toolkit to apt sources.
$ distribution=$(. /etc/os-release;echo $ID$VERSION_ID) \
  && curl -fsSL https://nvidia.github.io/libnvidia-container/gpgkey | gpg --dearmor -o /usr/share/keyrings/nvidia-container-toolkit-keyring.gpg \
  && curl -s -L https://nvidia.github.io/libnvidia-container/$distribution/libnvidia-container.list | \
        sed 's#deb https://#deb [signed-by=/usr/share/keyrings/nvidia-container-toolkit-keyring.gpg] https://#g' | \
        tee /etc/apt/sources.list.d/nvidia-container-toolkit.list
Install the toolkit and restart docker.
$ apt update
$ apt install nvidia-container-toolkit
$ systemctl docker restart
Configure nvidia runtime
Open /etc/nvidia-container-runtime/config.toml file, find #no-cgroups=false line and set it to true.
...
no-cgroups=true
...
Finally run:
$ nvidia-ctk runtime configure --runtime=docker
$ nvidia-ctk cdi generate --output=/etc/cdi/nvidia.yaml
Attention: You may need to run the last line above before running any container (not 100% sure), so keep it somewhere handy.
Test GPU access in a docker container
Run a simple Ubuntu container to test GPU access.
$ docker run -it --rm --gpus=all ubuntu:22.04 nvidia-smi
Unable to find image 'ubuntu:22.04' locally
22.04: Pulling from library/ubuntu
6414378b6477: Pull complete
Digest: sha256:0e5e4a57c2499249aafc3b40fcd541e9a456aab7296681a3994d631587203f97
Status: Downloaded newer image for ubuntu:22.04
Sun Oct 27 04:32:29 2024
+-----------------------------------------------------------------------------+
| NVIDIA-SMI 550.127.05   Driver Version: 550.127.05   CUDA Version: 11.4     |
|-------------------------------+----------------------+----------------------+
| GPU  Name        Persistence-M| Bus-Id        Disp.A | Volatile Uncorr. ECC |
| Fan  Temp  Perf  Pwr:Usage/Cap|         Memory-Usage | GPU-Util  Compute M. |
|                               |                      |               MIG M. |
|===============================+======================+======================|
|   0  NVIDIA GeForce ...  Off  | 00000000:01:00.0 Off |                  N/A |
|  0%   47C    P8    13W / 180W |      1MiB /  8117MiB |      0%      Default |
|                               |                      |                  N/A |
+-------------------------------+----------------------+----------------------+

+-----------------------------------------------------------------------------+
| Processes:                                                                  |
|  GPU   GI   CI        PID   Type   Process name                  GPU Memory |
|        ID   ID                                                   Usage      |
|=============================================================================|
|  No running processes found                                                 |
+-----------------------------------------------------------------------------+
Install Frigate with Hardware Acceleration
In this section I will share my minimal config that showcases the main goal of running Frigate with GPU acceleration.
Important: If you are new to Frigate, I urge you to follow the official instructions first. They are easy to follow, but also pretty substantial.
Attention: Pay special attention to the Hardware Acceleration (for NVIDIA GPUs) and Nvidia TensorRT Detector instructions to understand how GPU should be configured.
Configure and Run Frigate service
My docker-compose.yaml file:
services:
  frigate:
    container_name: frigate
    restart: unless-stopped
    image: ghcr.io/blakeblackshear/frigate:stable-tensorrt
    shm_size: "2048mb"
    volumes:
      - /etc/localtime:/etc/localtime:ro
      - ./config:/config
      - ./storage:/media/frigate
      - type: tmpfs # Optional: 1GB of memory, reduces SSD/SD Card wear
        target: /tmp/cache
        tmpfs:
          size: 1000000000
    ports:
      - "5000:5000"
      - "8554:8554" # RTSP feeds
      - "8555:8555/tcp" # WebRTC over tcp
      - "8555:8555/udp" # WebRTC over udp

    environment:
      - USE_FP16=False
      - YOLO_MODELS=yolov7-320
      - TRT_MODEL_PREP_DEVICE=0
      - CUDA_MODULE_LOADING=LAZY

    runtime: nvidia
    deploy:
      resources:
        reservations:
          devices:
            - driver: nvidia
              #device_ids: ['0'] # this is only needed when using multiple GPUs
              count: 1 # number of GPUs
              capabilities: [gpu]
Pay attention to the environment, runtime, and deploy settings. Also note that I am using frigate:stable-tensorrt version of the docker images, which is version that ships with necessary libraries to run TensorRT models.
Frigate config file /config/config.yaml:
go2rtc:
  streams:
    my-rtsp-camera: # <- for RTSP streams
      - rtsp://username:[email protected]:554//h264Preview_01_main # <- stream which supports video & aac audio
      - ffmpeg:rtsp_cam#audio=opus   # <- copy of the stream which transcodes audio to the missing codec (usually will be opus)
cameras:
  my-rtsp-camera:
    ffmpeg:
      hwaccel_args: preset-nvidia-h264
      inputs:
        - path: rtsp://127.0.0.1:8554/my-rtsp-camera
          roles:
            - detect
            - record
    detect:
      width: 2560
      height: 1440
record:
  enabled: true
  retain:
    days: 7
    mode: motion
  events:
    retain:
      default: 14
      mode: active_objects
mqtt:
  host: mqtt.server.com

detectors:
  tensorrt:
    type: tensorrt
    device: 0 #This is the default, select the first GPU

model:
  input_tensor: nchw
  input_pixel_format: rgb
  width: 320
  height: 320
You do not need to download a model. It will automatically configure and build the model that we specified in YOLO_MODELS environment variable.
$ docker compose up
...
frigate  | Creating yolov7-320.cfg and yolov7-320.weights
frigate  |
frigate  | Done.
frigate  | 2024-10-28 04:42:40.009374904  [INFO] Starting go2rtc healthcheck service...
frigate  |
frigate  | Generating yolov7-320.trt. This may take a few minutes.
...
It will complete generating the model and start Frigate service in a few minutes.
Check GPU Usage
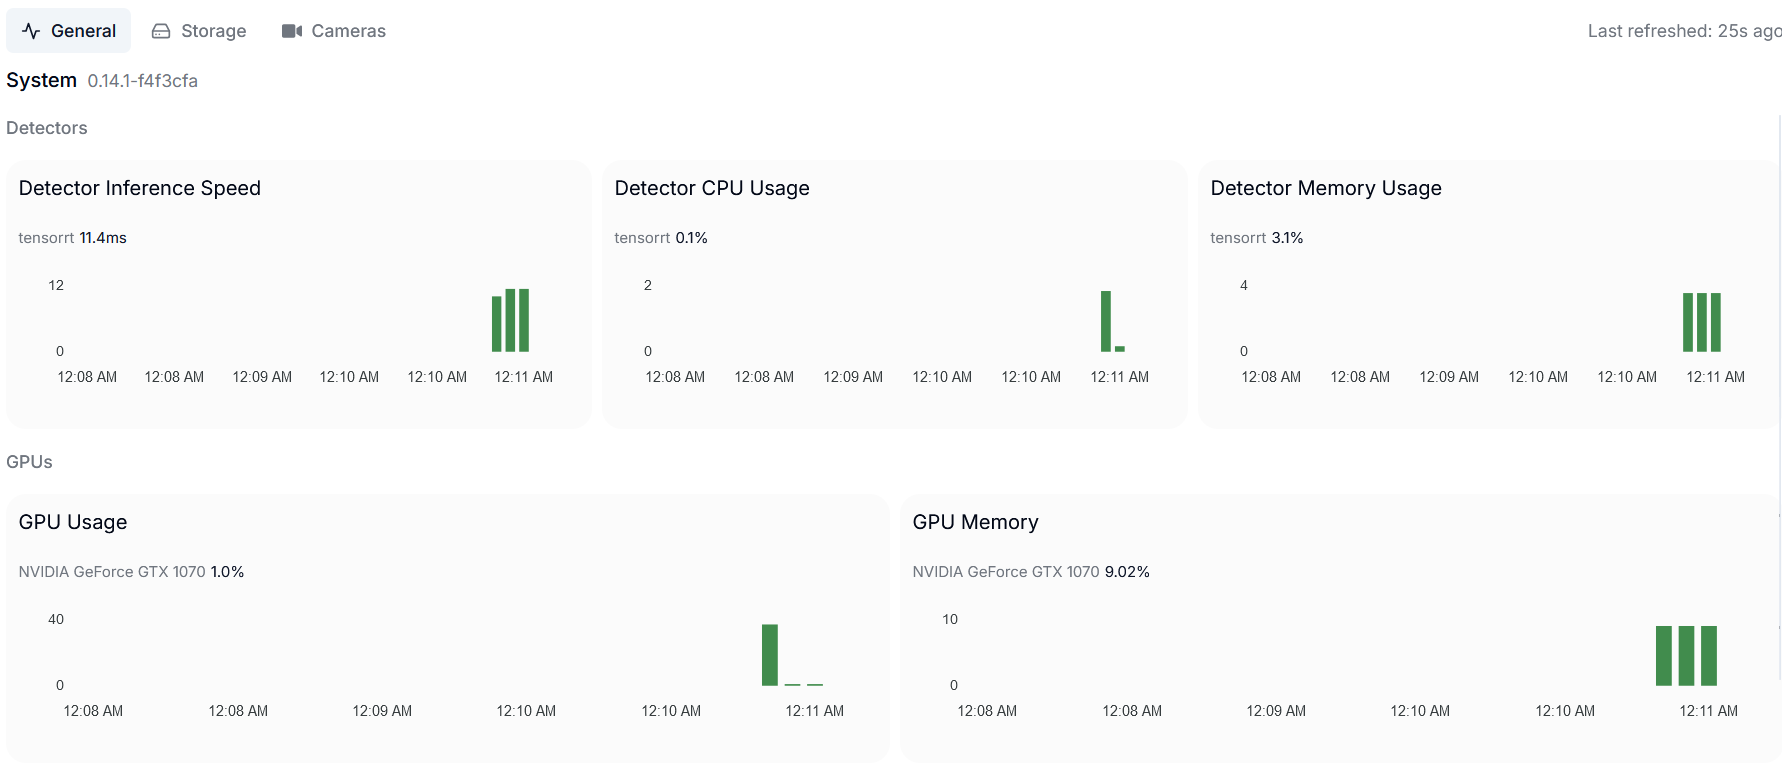
We can see that GPU is used for object detector:

We can also check which processes are being run by the GPU:
Attention: Due to docker limitations nvidia-smi does not show any process in the LXC or docker containers. Fortunately, it works if we run it on the proxmox host. See the issue for details.
# We are in the proxmox host console
$ nvidia-smi
Mon Oct 28 00:12:04 2024
+-----------------------------------------------------------------------------------------+
| NVIDIA-SMI 550.127.05             Driver Version: 550.127.05     CUDA Version: 12.4     |
|-----------------------------------------+------------------------+----------------------+
| GPU  Name                 Persistence-M | Bus-Id          Disp.A | Volatile Uncorr. ECC |
| Fan  Temp   Perf          Pwr:Usage/Cap |           Memory-Usage | GPU-Util  Compute M. |
|                                         |                        |               MIG M. |
|=========================================+========================+======================|
|   0  NVIDIA GeForce GTX 1070        Off |   00000000:01:00.0 Off |                  N/A |
| 26%   52C    P2             37W /  180W |     653MiB /   8192MiB |      0%      Default |
|                                         |                        |                  N/A |
+-----------------------------------------+------------------------+----------------------+

+-----------------------------------------------------------------------------------------+
| Processes:                                                                              |
|  GPU   GI   CI        PID   Type   Process name                              GPU Memory |
|        ID   ID                                                               Usage      |
|=========================================================================================|
|    0   N/A  N/A     35963      C   frigate.detector.tensorrt                     320MiB |
|    0   N/A  N/A     36001      C   ffmpeg                                        330MiB |
+-----------------------------------------------------------------------------------------+
Notice that GPU is handling both object detection and H.264 decoding with ffmpeg.


